Live Rock and Live Sand: The Complete Guide
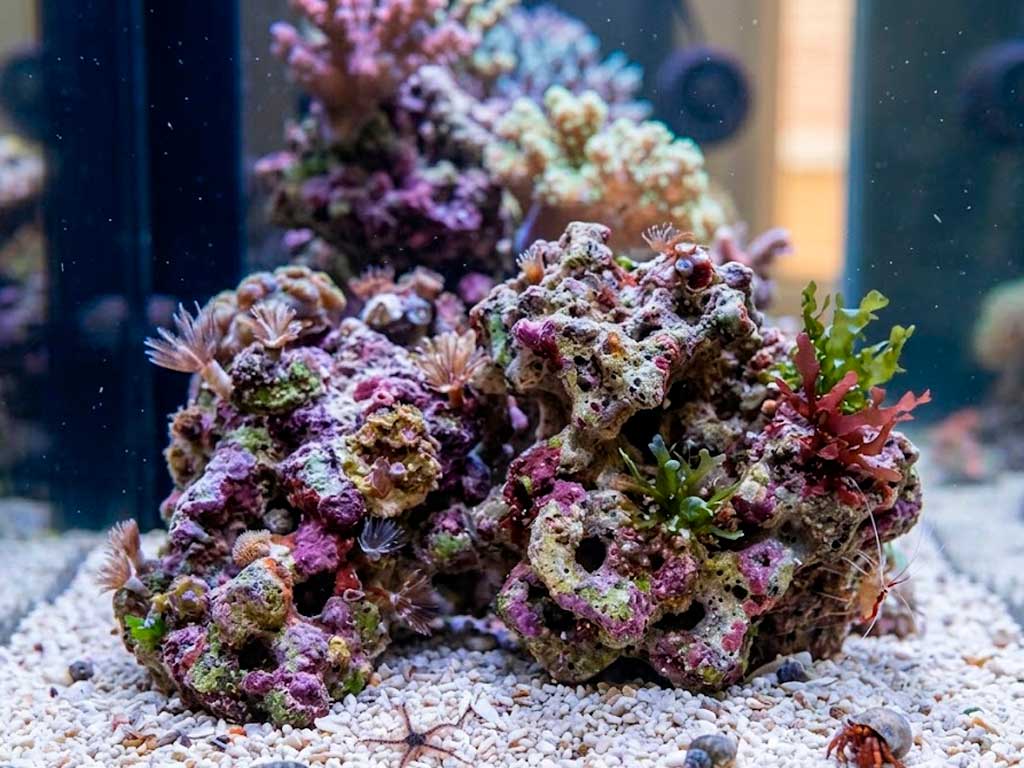
Rock and sand look like decoration, but in a saltwater tank they are working equipment. Together they handle a meaningful share of your biological filtration, shape the whole aquascape, and decide how much pest risk and waiting time you sign up for before your first fish goes in.
Getting this choice right saves you months of headaches later.
This guide covers what live rock and live sand actually do, how they compare to dry and man-made alternatives, how to cure rock safely, and how to build an aquascape that works with your flow instead of against it.
If you haven’t chosen your equipment yet, start with our saltwater aquarium setup guide for beginners.
Quick answer: Live rock and live sand are porous, calcium-carbonate materials colonized by beneficial bacteria that handle biological filtration while also forming your aquascape and substrate. Most modern reef keepers start with dry rock and dry sand instead of true ocean-harvested live rock, since it carries far less pest risk and cost, then seed it with bacteria to become biologically active over several weeks.
What Live Rock Actually Does
Live rock is porous calcium-carbonate rock, often the ancient skeletal remains of long-dead corals, colonized by bacteria, algae, and small marine life. It does three jobs at once in your tank.
- Biological filtration: Bacteria on the oxygen-rich outer surface convert ammonia into nitrite and then nitrate, the same nitrogen cycle covered in our water chemistry guide. Deeper inside the low-oxygen pores, other bacteria can convert nitrate into nitrogen gas that simply leaves the water.
- Aquascaping: Rock forms the visual structure of the tank, mounting points for corals, and a mix of high-light and shaded zones.
- Habitat: Caves and crevices shelter fish and invertebrates, and host copepods, amphipods, and worms that feed into the tank’s food web.
Live Rock vs. Dry Rock vs. Man-Made Rock
These are not simply better or worse versions of the same product. Each solves a different problem.
- True live rock: Ocean-colonized rock kept wet and biologically active the entire time. Arrives with immediate biodiversity, bacteria, coralline algae, and small critters, but carries the highest pest risk and usually the highest cost.
- Dry (dead) rock: The same type of reef rock, dried and biologically inactive. Lowest pest risk and cost, but needs cycling and bacterial seeding before it becomes useful filtration.
- Man-made or aquacultured rock: Cast aragonite or cement-based rock, or rock deliberately grown in controlled marine systems. Pest risk stays low if freshly cast, and shapes are often more consistent and easier to plan an aquascape around.
Most modern reef keepers start with dry or man-made rock precisely because it offers a clean, pest-controlled, and more affordable foundation. You then seed it with bottled bacteria, mature biological media borrowed from an established tank, or one small, carefully inspected piece of true live rock, and let it colonize naturally over the following weeks.
| Rock Type | Pest Risk |
| True live rock | Highest |
| Dry rock | Lowest |
| Man-made/aquacultured | Low to moderate |
| Rock Type | Typical Cost |
| True live rock | Highest |
| Dry rock | Lowest |
| Man-made/aquacultured | Mid to high |
Curing Live Rock: What It Means and How to Do It
Curing is the controlled process of letting dead and dying organic material on live rock decompose and get exported before the rock ever touches your display tank. Any live rock that spends real time out of water can experience die-off, sponges, worms, and algae dying during collection or transport, and as that material breaks down, it releases ammonia. Adding uncured rock straight into a stocked tank risks a serious ammonia spike.
Signs Your Rock Needs Curing
- A strong rotten or sulfur-like smell.
- White or grey bacterial slime.
- Visible dead sponge, algae, or soft tissue.
- A measurable ammonia reading once the rock sits in saltwater.
Step-by-Step Curing Process
- Rinse the rock in prepared saltwater and gently remove obviously dead material.
- Set up a dedicated curing container: a spare tank or food-safe bin with correctly mixed saltwater, a heater, and strong water movement, kept dim or unlit.
- Let the die-off decompose. Bacteria convert the released ammonia into nitrite, then nitrate.
- Perform regular water changes to export the accumulating nutrient load and speed things along.
- Test rather than guess. The rock is ready only once ammonia and nitrite both read zero and stay there, typically 2 to 6 weeks depending on how much die-off occurred. Our cycling troubleshooting guide covers what to do if those readings won’t budge.
Common Hitchhikers: The Good and the Bad
True live rock often arrives with unplanned passengers. Inspect every piece under strong light before it goes in the display, and let it sit in a curing or quarantine container long enough for pests to reveal themselves.
- Welcome hitchhikers: Copepods and amphipods (food web and fish food), coralline algae (a sign of stable calcium and alkalinity), feather duster worms, and tiny brittle stars that scavenge organic material from crevices.
- Potential pests: Aiptasia (fast-spreading glass anemones that sting corals), mantis shrimp (listen for repeated clicking sounds), predatory crabs, and pest algae like bubble algae, hair algae, or bryopsis.
Fully drying rock is the most reliable way to eliminate every hitchhiker, but it also destroys the beneficial biology that makes true live rock valuable in the first place, which is exactly the tradeoff that pushes many keepers toward dry rock plus deliberate seeding instead.
Live Sand: Types, Depth, and How Much You Need
Sand gets less attention than rock, but the choice still affects your tank’s biology and which fish will actually thrive in it.
Live sand is aragonite sand already colonized with bacteria and microfauna, while dry sand is the same material without the biology, needing time to cycle the same way dry rock does. Grain size matters more than most beginners expect: fine, sugar-sized sand supports sand-sifting fish like certain gobies and jawfish, which need to burrow and sift through it to feed and feel secure. Coarser sand looks natural too but doesn’t support that behavior nearly as well.
Depth is where opinions genuinely differ. A shallow sand bed of roughly 1 to 2 inches has become the more common modern choice for display tanks, since it looks clean and carries less risk than a deep sand bed.
A deep sand bed of 3 to 4 inches or more was popular in the past for its anaerobic denitrification zone deep within the sand, but it also carries a real risk: if disturbed (by digging fish, a curious aquascaping change, or simple settling over time), a deep bed can release trapped hydrogen sulfide into the water column, which is toxic.
Many reefers now prefer a shallow display bed and, if they want the denitrification benefit of a deep bed, build it into a refugium instead, where it’s less likely to be disturbed.
As a rough guide, budget around 1 to 1.5 pounds of sand per gallon for a shallow bed, adjusting up if you’re going deeper or your tank’s footprint is unusually large relative to its volume.
Aquascaping Fundamentals
- Dry-stack for simplicity, bond for tall structures: Simple dry-stacking is quick and easy to rearrange, but unstable towers, arches, or overhangs need reef-safe cyanoacrylate gel, epoxy putty, or mortar to stay secure.
- Build on the tank bottom, not on sand: Aquascape directly on the bare glass or a protective support layer, then add sand around it. Rock resting on sand can shift as burrowing animals move substrate or as the sand settles.
- Leave negative space: Avoid a solid wall of rock against the glass. Open channels let water move through the structure, reducing detritus buildup and nuisance algae in low-flow pockets, a concept covered in more depth in our water pump and circulation guide.
- Less is often more: A lighter aquascape means better circulation, more swimming space, easier cleaning access, and more room for corals to grow into their mature size without crowding each other out.
How Much Rock Do You Need?
A commonly quoted starting estimate is 1 to 2 pounds of rock per gallon, but treat that as a rough historical reference rather than a fixed requirement. Modern, highly porous rock, better biological filter media, and reliable bacterial products let many reefers use noticeably less rock while keeping strong filtration and open swimming space.
A practical, cost-effective approach: use affordable dry or base rock for the hidden bulk of the structure, then add a smaller number of premium shelf, branch, or unusually shaped pieces at the visible focal points. Seed the whole system with bottled bacteria or a small piece of true live rock, and let it mature from there.
Frequently Asked Questions
Should I buy live rock or dry rock for a new tank?
Most new reef keepers are better served by dry or man-made rock, since it’s typically more affordable, easier to aquascape, and much lower in pest risk. Seed it with bottled bacteria or a small, carefully inspected piece of live rock for biodiversity.
How long does it take to cure live rock?
Commonly 2 to 6 weeks or longer, depending on how much die-off is present. The rock is ready only when ammonia and nitrite both test at zero and stay there, so test rather than count days.
Can I put live rock in the sump instead of the display?
Yes, and many reefers do exactly this. Rock in the sump still contributes biological filtration without taking up display space or competing for the aquascape you actually want to look at.
Why does my live rock smell bad or have slimy patches?
That’s a sign it needs curing. Dead sponge, algae, or soft tissue decomposing on the rock produces both the smell and the slime, and adding it to a stocked tank in that state risks an ammonia spike.
How much live rock do I need for my tank?
A common starting estimate is 1 to 2 pounds per gallon, though modern porous rock and better filtration mean many tanks do well with less. Base it on your aquascape style, rock porosity, and how much open swimming space you want.
Is a deep sand bed dangerous?
It carries some risk if disturbed, since trapped hydrogen sulfide can release into the water column if the bed gets stirred up. A shallow sand bed in the display, with a deep bed contained safely in a refugium if you want one, avoids that risk while still offering the denitrification benefit.
Can I glue live rock together to build arches?
Yes. Reef-safe cyanoacrylate gel, epoxy putty, or mortar all work for building secure arches, shelves, and tall structures. Confirm the finished structure is stable before adding any livestock.
Rock and sand set the tone for everything that follows in your tank, from how well your filtration performs to how easily you can maintain it years down the road. Take the time to choose deliberately, cure patiently, and leave room for the aquascape to breathe, and the foundation will keep working quietly in the background for as long as the tank runs.